Throwback Thursday- Binder Covers!

Thursday, September 3, 2015

Hello, everybody!

I thought that it might be nice to do a few back-to-school themed posts, and since I'm currently having photo-uploading issues, I decided to do a throwback Thursday!

I originally posted this back in...January? Yeah, I think it was January. A lot of you seemed to like it, so I thought it would be nice to bring it back for some of the newer readers!

Without further ado, here's how to make your own DIY binder covers!!

~~~~~~~~~~~~~~~~~~~~~~~~~~~~~~

Step One : Pick a background print!

So, what I like to do is to go to Google and type in, "_______ iPhone background. " In this case, I wanted a yellow chevron print, so I type in "Yellow Chevron iPhone background". iPhone backgrounds are the best to use because they're rectangular like a sheet of paper.

Step Two : Open Word and insert your image!


Step Three : Resize the Image


To do this, all you do is resize the margins so that they are at 0, and then drag the image out to take over the entire sheet of paper.


Step Four : Celebration!! :D

Woo hoo! You've gotten this far!! It took me a good hour to figure out how to do this my first time, but then again, I didn't have a tutorial to teach me! Anyways, now you have your pattern covering your screen, so congratulations!!! It should look something like this-


Step Five : Add your text

Now, you'll want to put the subject name! All that you have to do is create a text box and drag it where you'd like on the paper. Then, type your subject name.


But don't worry, it won't look this blah for long!!! Because....

Step Six : Cute-ify Your Cover!!!!

That's right ladies, time for the best part- making it look cute!!! I like to center the title, and then put it in a cute font. My favorite font on Word is Curlz MT. It's so cute and girly!!


Step Seven : Add some symbols for flair!

I like to add some of those cute copy-and-paste symbols on either side of the title. :) For this cover, I decided to go with flowers.


And, there you go! You have a cute binder cover! I like to make these for all of my subjects.

~~~~~~~~~~~~~~~~~~~~~~~~~~~~~~

And there you have it! I hope that you all have a lovely Thursday!

Tutorial Tuesday- How to Reuse Old EOS Containers!

Tuesday, April 14, 2015

Hey everybody! I haven't done a Tutorial Tuesday in forever, just because they take a bit more time to put together than I usually have haha. ;) But I actually have one to share with you all today- how to reuse your old EOS containers! I don't know about you, but I'm obsessed with EOS. Thus, I end up with a lot of empty containers. And, being the hoarder that I am, I naturally want to reuse the containers! So, here's how I do it! :)

So, first off, supplies. You're going to need an EOS that you've finished, a plastic spoon, and paper towels.
You're also going to need wire cutters, preferable pink ones. ;) These somehow didn't make it into the supplies picture above :P
So, you have your lovely, old, flat EOS. It's sad. You can't use it anymore. Why does it even exist at this point? Shouldn't it magically regenerate? I think so.
 But, since it won't be a good little lip balm and regenerate, you have to reuse it. So you take your plastic spoon and scrape the top off.
Now, it should look something like this. You should be able to see the nice little pinwheel. Hello, pinwheel!
This next step isn't really required, but I feel like it kind of makes things easier. Using the end of the spoon, poke each little triangle inwards. It will get it off of the pinwheel somewhat, which will help you.
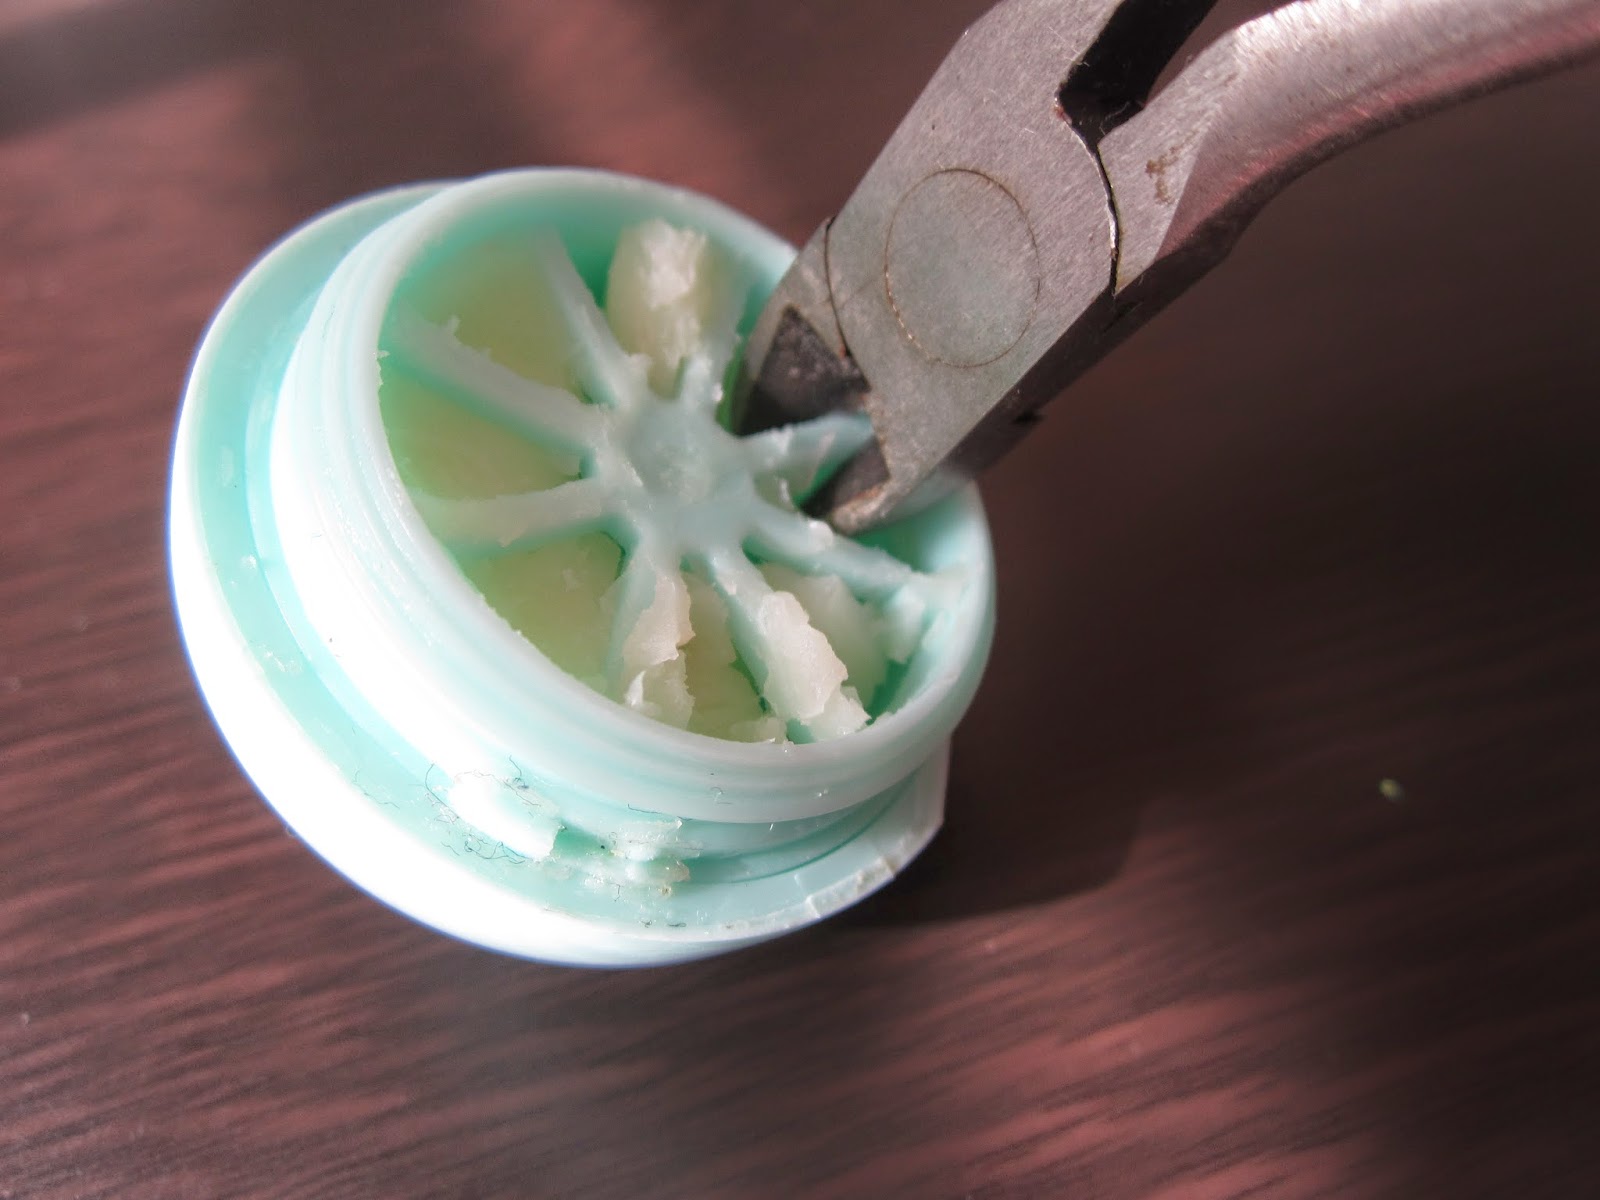
Next, you take the wire cutters and snip each little plastic piece as close to the end as possible. (Let me just say, this picture was not easy to take. At. All.)
Aaaaand, the pinwheel is out! I'm sorry, but I just think that it's adorable. XD I still want to figure out some way to reuse the pinwheel, but I can't come up with anything. Any ideas, readers??
So now, this is what it should look like on the inside.
Okay random little tangent here, you get little EOS chunks in the shape of a tiny piece of cake or a pizza slice! Yay! I just think it's super cute. XD Moving back on track...
Next, clean out the eos REALLY WELL. You don't want it to be all slimy and greasy when you use it.
Now that it's clean, you get to decorate it!!! I just took a grey sharpie and did polka dots, but you can really do whatever you want with it. Have fun!!!
And, you're done! :D You can really use this tiny container for whatever you want. I like to use it to hold my earrings when I travel- I can keep like, twenty pairs of studs inside! I was really shocked with how spacious they are. You can use them for other things too though, they're perfect to keep some quarters inside, or to keep stocked with Advil or aspirin in your purse.

I hope that you've enjoyed this Tutorial Tuesday post! Hopefully I'll get to do more of these soon. :) If you have anything to say, leave a comment below!


Easy Valentine's Day DIY Gift!

Sunday, February 8, 2015

This is just a quick post, but I have a really cute DIY V-Day gift that I wanted to show you all! :)

This is so easy, it's basically self-explanatory. Literally all that you have to do is take a piece of paper, write L_VE on it, and attach an EOS lip balm! It's a great gift to give to your friends, because I mean really-who doesn't love EOS?

Valentine Idea For Friends + Lazy Saturday OOTD!

Saturday, February 7, 2015

Hello, ladies! So, today I had TWO posts that I wanted to share, so I'm combining them all into this one! I'm super excited to share this fun Valentine's Day idea for your friends, and I had this really cute Lazy Day OOTD that I also am excited to show you all!

So, if you ask me, Valentine's Day really seems to sneak up on us. Before you can turn around, it's February, and by then we only have TWO measly weeks until Valentine's Day! It always seems like I'm scrambling around at the last minute trying to come up with ideas for cards or gifts for my friends on Valentine's Day. This is a really quick, easy idea that I also think is really sweet and thoughtful.

Disclaimer: I am not an artist, nor do I claim to be. I'm much more comfortable creating pictures out of words than I am drawing them out! Thus, the following images are not exactly beautiful. Trust me, I'm fully aware of it. :P

14 Reasons I Love You!! 

So, I've seen this idea around for lots of different holidays, but I decided to put a Valentine's Day spin on it! After all, Valentine's Day is on February 14th, so why not come up with 14 reasons that you love someone?

Supplies-wise, all you need for this gift is some regular white paper, and some bright colored pens. You could really use anything here, (Sharpies, markers, colored pencils, etc) but I kind of have an obsession with colored pens, so I decided to use them.

So, first, you make a pretty heading (to the best of your artistic abilities ;) !), preferable with lots of color!!! I liked adding some little hearts around the heading as well.

Next, just start making your list!!! It's super easy, and the person that you give it to is sure to love it. After all, who WOULDN'T love a list of why somebody loves them? It's super sweet. :)


I also wanted to share with you all this OOTD!! I've never really done OOTDs before, so if you like this post, comment below and let me know!

This outfit is super cozy and comfortable, and it's also really cute! It's pretty unusual for me to look cute at home, usually I just wear anything comfortable. Last weekend though, my mom found this Lion King sweatshirt at Wet Seal, and I fell in love! You all know that I absolutely adore the Lion King, so whenever I see something that involves the Lion King, it's quite hard for me to resist buying it!
Anyways, here's where I bought everything..

Sweatshirt- Wet Seal
Leggings- Forever 21 (Let me just say, oh my gosh. F21 leggings are the best! They are sooo comfortable, I love them.)
Beanie- I actually crocheted this! I was quite proud of myself haha ;)

So there you have it, my lazy day OOTD! 


Well, that's all for today! If you liked this post or have anything to say, please comment below, I love hearing from you all! And if you make your own 14 Reasons I Love You, comment a link below :) Thanks for reading!

Tutorial Tuesday- Binder Covers!!!

Tuesday, January 13, 2015

Hi everyone! So, for today's Tutorial Tuesday post, I decided to show you how I make my binder covers. Since it's the beginning of a new semester, it's a perfect time to spice up those boring binders from last semester. After all, in my opinion, it's a lot easier to deal with having to look at those evil school supplies every day if they're pretty!!

Step One : Pick a background print!

So, what I like to do is to go to Google and type in, "_______ iPhone background. " In this case, I wanted a yellow chevron print, so I type in "Yellow Chevron iPhone background". iPhone backgrounds are the best to use because they're rectangular like a sheet of paper.

Step Two : Open Word and insert your image!

Step Three : Resize the Image


To do this, all you do is resize the margins so that they are at 0, and then drag the image out to take over the entire sheet of paper. :)

Step Four : Celebration!! :D

Woo hoo! You've gotten this far!! It took me a good hour to figure out how to do this my first time, but then again, I didn't have a tutorial to teach me! Anyways, now you have your pattern covering your screen, so congratulations!!! It should look something like this-

Step Five : Add your text

Now, you'll want to put the subject name! All that you have to do is create a text box and drag it where you'd like on the paper. Then, type your subject name.

But don't worry, it won't look this blah for long!!! Because....

Step Six : Cute-ify Your Cover!!!!

That's right ladies, time for the best part- making it look cute!!! :) I like to center the title, and then put it in a cute font. My favorite font on Word is Curlz MT. It's so cute and girly!!

Step Seven : Add some symbols for flair!

I like to add some of those cute copy-and-paste symbols on either side of the title. :) For this cover, I decided to go with flowers.

And, there you go! You have a cute binder cover! I like to make these for all of my subjects. :)

So, what do you think? It's super simple, and I love making my school supplies look nice. If you have any questions, just let me know in the comments!!!

~Grace Anne


10 DIY Gift Ideas!!!!

Saturday, December 20, 2014

So, I know that during the holiday season, there are a lot of gifts to buy, and money can be tight. That's why sometimes homemade gifts can be the best! They're fun to make, and they mean a lot more to the person who receives them than a store bought gift would. So, here I've compiled a list of all of my favorite DIY gift ideas, to hopefully give you some holiday gift inspiration! :)

1. Jewelry
Homemade jewelry is so much fun to make, and it's actually really simple. You can go to any craft store and find a cute charm for a necklace or earrings. You can also make some really cute bracelets from embroidery thread. There are lots of fun patterns on the internet that aren't very hard to make. You can find some great patterns here :)

2. Knitted or Crocheted Items

If you know how to knit or crochet, you can find great patterns on Pinterest and make some really easy and cute gifts. I personally like arm knitting, and you can make some really great chunky cowls within half an hour. Should I do a tutorial sometime? Comment below if you'd like one! :)

3. Lollipop Bouquet

These are so simple, and so cute. Just take a flowerpot, put a big styrofoam ball inside, and then stick dum dum lollipops in in to make a cute bouquet. Bethany Mota has a great YouTube tutorial for it on her channel. :) Go Motavators!!

4. Picture Frames

I think that it's super cute to get a plain frame from a craft store, and paint it however you like. You can write a cute message to a friend, and then put a picture of the two of you inside. It's a super cute and thoughtful gift.

5. Photo Collage/Photobooth

Speaking of photos, if you go on a website like Snapfish, you can make some really cute collages or photo albums. They're a great gift to give to family and friends that can be enjoyed for years to come!

6. Gag Gifts

Really, who doesn't love a gag gift? You can make some really funny gag gifts from things around the house. Again, if you go on Pinterest, you can find some really great and funny ideas.

7. DIY Mug

If you get a plain white mug from a craft store, you can decorate it with Sharpies or paint pens to make a super cute and simple gift. Include a packet of their favorite tea or hot chocolate, and it's the perfect gift for the warm-drink lover in your life!

8. Mani/Pedi Set

Include some nice nail polishes, an emery board, some nail polish remover, q-tips, and nail decals to make a great Mani/Pedi set for a friend! :)

9. DIY Stenciled Sign

With a canvas, some stencils, and some black paint, you can make personalized signs that anyone would love! Just paint on a favorite saying, a monogram, or some song lyrics. Whoever you give it to is bound to love it! :)

10. Modge Podge Makeup Brushes

I did this to one of my makeup brushes, and it turned out super cute. All you do it coat a makeup brush in some Modge Podge, and add glitter. Let it dry, and repeat this several times. Be sure to add a final coat of Modge Podge to seal it the glitter. You end up with super sparkly, super cute makeup brushes than any girl would love!

Well, hopefully this list has helped you come up with some gift ideas! :) Do you have some awesome DIY gift ideas? Let me know in the comments below!

The Super-Mega-Uber-Awesome DIY Costume Post!!!!!

Thursday, October 30, 2014

(just a note for you all, I wrote this yesterday, so it's kind of in past tense..)

Hey everybody! First off, I'm really sorry I've been so inactive. I was out of town for a few days (a post on that soon!!!!), and then I was absolutely crammed with schoolwork. Chemistry is BRUTAL. -_- So, I've been really sad that I couldn't do more Halloween posts, but it have one more for you all before the big day tomorrow! Drumroll please.....


I figured that I owed you guys one final Halloween post, and to make up for the week I went without posting, I'm making it a huge blowout post!!! I hope you enjoy!!!! I spent the entire afternoon working on these costumes, so I really hope you like them. Without further ado... Here you go!! :)

#1. Cute Cat!!

Prep time: 15 Minutes

I have to say, this one is one of my favorites. It's so fun, and so simple! Plus, it's so cute and comfy!!
So, all that this costume needs is a black top (I used the holey sweater I talked about a while ago), black leggings or yoga pants (I wore Danskin leggings), and some black shoes. I wore these cute suede boots I got a few years ago from Payless, but if I wear this for Halloween, I'll probably wear the wedge booties I talked about a few weeks ago, because they're more comfortable. :)
For hair and makeup, I went for something fairly simple. For hair, I just did two high pigtails, but you could also do two buns, or wear felt cat ears. Then for my makeup, I just did winged eyeliner (which took AGES to get even :P ), drew a little heart-shaped nose, and added some cute little whiskers with liquid eyeliner. It all could be done within a matter of minutes, so it's cute AND fast!!
Andddd... Here's the final look! Isn't it cute? I love it. I look SO pale in these outdoor pictures, it's weird. :P 

#2. Hipster Rapunzel

Prep Time: 10 Minutes

So, I kind of love Rapunzel. Plus, I've been told I look like her, which makes it even more fun!! 
So, all you need are purple skinny jeans, and a light pink top. I added a white jacket since the only top I had was a tank top, and I didn't want to freeze. 

I love this! So, all I did for makeup was basic makeup with some pale pink lipstick. I added purple flower earrings, braided my hair, and put some cute flowers in it. The nerd glasses add a bit of Hipster flair. And what is Rapunzel without her frying pan for protection?? I thought it was the perfect finishing touch :)

#3. Hipster Elsa

Prep Time: 10 Minutes

Since I was doing Rapunzel, I thought I would also do her cousin, Elsa! Ever since I saw Frozen, I just can't seem to...let it go. ;)
This costume is similar to the Rapunzel one. White skinny jeans, a pale blue tank top, and the white denim jacket. This outfit was really easy to put together, and oh so fun!!
Cute, huh? I reused the nerd glasses from my Rapunzel outfit, French braided my hair, and added some snowflake earrings and red lipstick. This was a super fast and easy costume, and I thought it turned out great. :)

#4. Halloween? Whatever.

Prep Time: 5 Minutes

So, this costume is for everyone who got so busy with life, that you didn't get to make a costume! Maybe you found yourself home on the couch when the first Trick-or-Treaters came to the door, and you're sitting around in old sweats. You might as well make yourself look cute! So, here's a five minute outfit that's adorable for Halloween!!
Literally all this costume requires is a Halloween top and a pair of black leggings. Easy!! :)
See? Simple AND cute! For hair and makeup, I just did a pony with a stretchy black headband, and basic, everyday makeup. I thought that the candy corn earrings added a perfect touch! Then again, I have more earrings than is probably socially acceptable, so...

#5. Cruella DeVil

Prep Time: 15 Minutes

I think that Cruella DeVil is a really fun character. She's so wacky, that this costume was so fun to put together!!
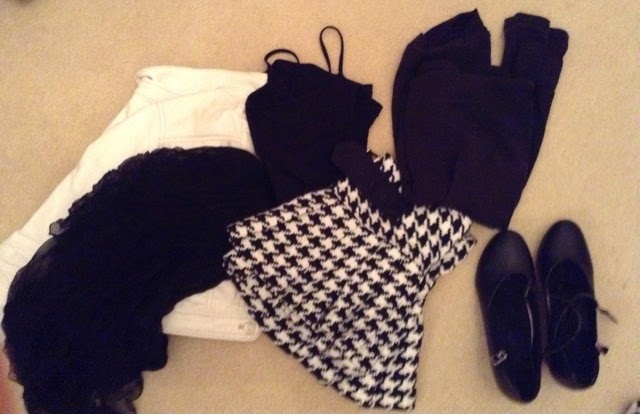
This one has the most pieces of any costume. I used a black tank top, a white denim jacket, a black scarf, this skirt I found at a thrift store, black leggings, and black character shoes. (Basically just heels)
Isn't it funny? I love it! All I added was some red lipstick, and then I teased my hair. My sister's Dalmatian was "volunteered", on the promise that I didn't hurt it haha. 
Had to send one more pic!

So, what did you guys think? Which one should I wear for Halloween tonight? Again, I'm so sorry I haven't been able to post. :( I've missed it!!!! Let me know what you all think of this post in the comments section!!!


A DIY Costume!

Monday, October 20, 2014

So, what did y'all think of that teaser I posted yesterday? So, today I have the full costume for you all! I went to a Halloween event last night, and I wanted to create a costume instead of buying it. After looking at a bunch of ideas online, I decided to go for this look....
Hipster Snow White!!!!!
So, what do you think? This costume was sooo much fun! It was also super easy, which was a perk. All that it consisted of was-

-Red Ribbon ( you can't see it but it was in my hair )
-Royal blue top (Hollister)
-Yellow shorts (Target)
-Apple earrings (optional)
-Nerd Glasses
-Red Keds

It's that simple! Here's a close up of me being my crazy self, and you can see my makeup look-

This picture made me look sooooo pale!! I did pale makeup for Snow, BUT I'M NOT THAT WHITE!! Agh. So, for the makeup, I did-

-Pale foundation (used the Elf tone corrector!)
-Lots of mascara
-Blush
-BRIGHT red lipstick
-Gold eyeshadow

Again, super simple! So, what do you all think???

~Grace Anne


CopyRight Grace Anne Johnson 2024 © | Theme Designed By Hello Manhattan